The Goal
Arguably, some musicians or bands are still trying to keep the authenticity of their songs, but in contrary, audio engineers are debatably trying to find the best way to treat sound by using the latest technology. A simple case: do we have to treat the equalizer plugins right? This is one of the small problems that doubt musician to trust audio engineers’ in achieving high-standard tracks because the sound they have recorded was often heavily processed until it loses its intended genuineness. Correspondingly, the goal of this article is choosing and using the right tool without having to debate the above-mentioned issue. Before we move on to the next step, let’s bare in mind that less is more; in order to get the most capability out of the tool isn’t to be trapped in it.
Analyzing the Source Material
Gitar Chorus Clean.aif (Credits: Guitar by Adhitya Rahardja. Recorded at DotoDo Studio, Bandung.)
As an example, the Gitar Chorus Clean.aif file above was recorded by using a simple cabinet setup with a dynamic microphone. If you bypass the effect, you can hear the sound was great on its own, but it lacks presence and sounded far too natural to be put into a complete track. Somehow the “aura” is still limited; so we can enhance more of the presence. We can also hear fingers sliding through the guitar neck, which is what we want.
Even by only analyzing the source, we as audio engineers wanted to do a lot of processing already. As we have examined, the source has already well prepared before it was recorded. But let’s face the fact that (some) people are buying your tracks because it has that extra determination that you put into it. So the challenge is to put the effort but let’s not make it “overload”.
The Built-in Way
Naturally as audio engineers, once the sound has been analyzed, we would look into the DAW’s own plugins because we have invested in not just on the platform but also all of the built-in plugins that comes with it. So let’s try using them first. For starter, we’ll compare between two Equalizer plugins; Ableton Live’s EQ Eight (simply because I’m accustomed to it) and EVE-AT1.
We will start by using Equalizer (EQ) Eight as a starting point to eliminate bad resonances and enhance the good ones. What we like from the Ableton Live’s EQ Eight and many of the built in equalizer plugins are it’s informative GUI and frequency visualization. Making it’s easy to find peaks and resonances rather than by ear, like EVE’AT1 and many vintage equalizer plugins.
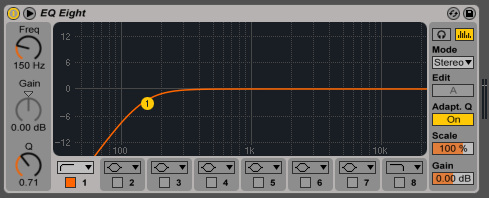
First of all, on the equalizer plugin, just simply high pass the low frequencies by 150Hz as a safe starting point and as expected we hear a lot of the muddiness on that area has taken out nicely. Next step is to adjust the mid-low frequency, as it is most of the natural sounding located.
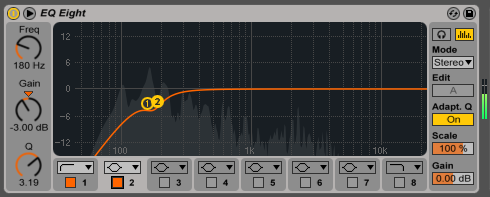
We do not want to eliminate nor enhance too much, but in this particular case, we would like to reduce a small part of that strumming because it peaks too much compared to the rest of the higher frequencies on the equalizers.
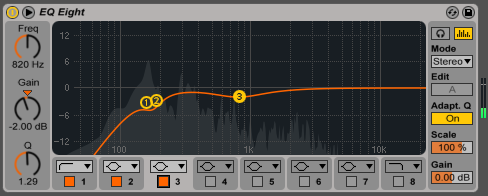
Moving on, we would like to take a little bit of that body on the middle frequency of EQ Eight equalizer pluginss, specifically 820 Hz. Personally, I find the guitar taking over too much of the middle space, it is important to take it into consideration, especially if this is going to be a vocal-based track as it will help create a required “space” for vocal to present in the mix.
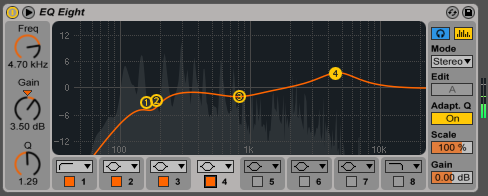
Subsequently, we are going to enhance the guitar’s presence quite a lot by 3.5db on 4.7kHz because it hides too much in the background, it needs extra brightness to justify the character of it.
Ok, since it’s after shaped and molded, now it should sits perfectly in the mix.
But…..
The EVE-AT1
The EVE-AT1 equalizer is a 3rd party plugin on it’s own, it got awards, and people spend more money for it, right? so it should be better sounding than the DAW’s built-in equalizers. Or else, it will be questionable. So, for next, let’s replicate the track, then mimic each of the tweaked frequencies using EVE-AT1 rather than using the built-in DAW effects. Once we have our EVE-AT1 in our channel track, apply all of the above Equalizer parameter to it because that is the only way to compare one thing to another, apple-to-apple.
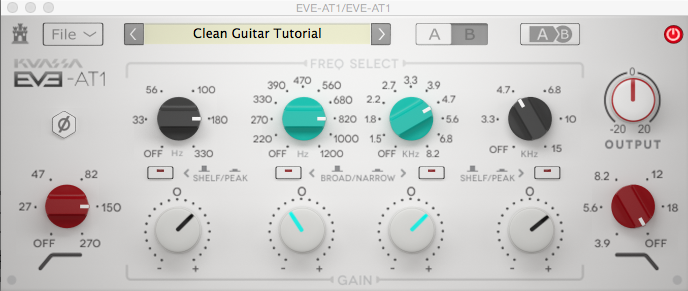
If you have done it, you will notice the difference especially the overall muddiness has been adjusted quite smoothly by the EVE-AT1. Thanks to it’s idiosyncratic bands and non-linearities modeled before the british classic EQ design, it adds that professional touch as if you were recording it in well-constructed acoustic studio. You have to admit this is a pretty sleek way to convince or to prove to the musician or band you working with that you are on their side and by maintaining the original sound.
Download the Ableton Live 9 session here: Guitar Clean Comparison Project