Recording Flawless Guitar to the Amplifikation Plugin part 2: Tone Building Workflow
To achieve flawless tone, the second important thing is by building the tone by yourself. We already include a number of default presets to accomodate many of your playing styles, those default presets can be great as a starting point for further tweaking. Instead, if we want to start from scratch and understand the tone-building process can leverage your knowledge in operating our Amplifikation Plugins. This workflow is basically similar if you want to record hardware Guitar Amplifiers in the real-world, here are the steps:
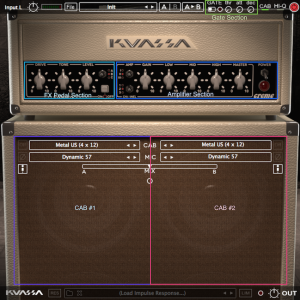
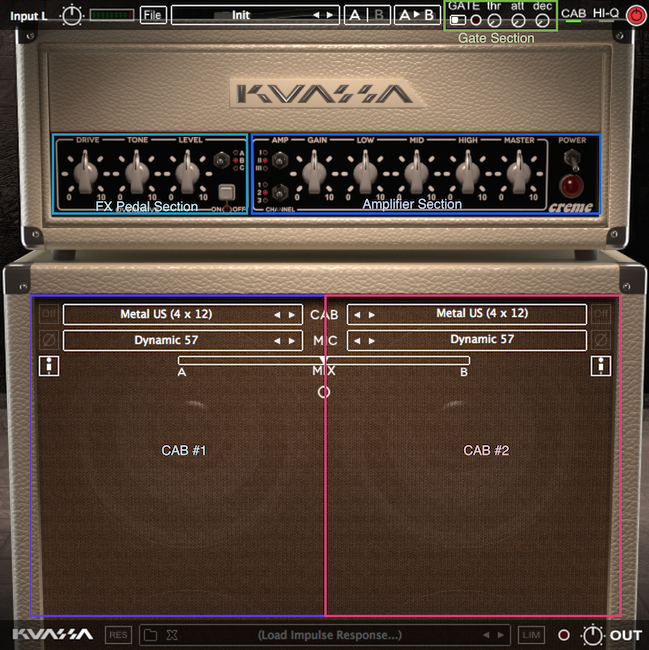
Start with the “Init” preset. “Init” is the default settings where all the knobs and parameters is in zero/neutral position and turned off.
Turn on the [AMP]. First setting is the type of amp you prefer, including the channel type. This will serve as the “base” of the tone you are making; clean, crunch, mild or heavy.
The second, is tweaking the noise gate to eliminate the noise caused by your guitar’s pickup. Here’s the typical workflow as follows:
Turn on the [Noise Gate], then hold the strings to know the overall noise level.
Slowly turn the [att] (attack) and [dec] (decay) knob to approximately 8 to 9 o’ clock position as a starting point.
Turn the [thr] (threshold) knob until the noise is gone
Try playing the guitar, and then adjust both the [att] and [dec] accordingly to set the slower or faster response depend on your playing style.
All of the Kuassa Amplifikation Plugins have two cabinets which you can use simultaneously. For making the basic tone, it’s easier and more focus if you use one first, tweak as you like, then use the second cabinet to fatten or layer the sound.
After choosing the Cabinet + Mic pair as the basic tone. Now it’s time to tweak the Amplifier section; adjust GainKnob to get the overdrive or gain level that you want. Always accomodate the volume jump by adjusting the Volume Knob.
Adjust the Tonestack (Low, Mid, High, Presence Knobs) to get the balance in frequency character or as desired. For the mixing process or if you want more extensive equalization options to make the guitar sits well in the mix, we recommend you to use another EQ like the EVE-AT series or EVE-MP5.
Now back to the Cab 1. Choose a pair of Cabinet and Microphone that you find best. You may need to back to the Tonestackknobs again due to changes in Cabinets or Microphones can alter the tone.
If you want to use the second Cabinet in mono mode. Try to turn-off Cab 1, then tweak the Cab 2. Cab 2 can complement, layer, or give extra sonics to the tone of Cab 1 which serves as the fundamental. Try to shape the tone of Cab 1 to fat low-mid frequency, then the Cab 2 for additional high frequencies, punch, and air.
Or you may try to use the stereo mode. Use different Cab + Mic pair, then tweak the pan and volume sliders oppositely to get that extra wide rhythm guitar layers.
Last step: To prevent clipping/overload, check if the LED in the output lit or not. And use the [Lim] button to maximize the loudness. Limiter [Lim] can make the tone louder in trade of reduced dynamics (good for harder rock style or metal). You will need that dynamics if you play a clean, crunch, or medium driven guitars which groove and the swinging “feel” is essential.