Our Product Specialist Dimi Nalbantov experiencing with Windows operating systems and using a PC’s as a digital audio production environment began around 1995. As you know Windows as an operating system has its own flaws, but it’s still one of the most used platform for audio software developers and audio producers & engineers.
My experience with Windows operating systems and using a PC’s as a digital audio production environment began around 1995.
As you know Windows as an operating system has its own flaws, but it’s still one of the most used platforms for audio software developers and audio producers – engineers.
Over the years we struggled with IRQ conflicts, compatibility issues, drivers conflicts. Installing different drivers were causing different problems.
Moving PCI audio cards over the PCI slots and entering manually DMA and IRQ addresses was a part of the “game” to have solid recording and writing computer. We were using this troubleshooting technique on Win 98 and later even on XP.
Later years and Windows 7 – DPC Latency interrupts
DPC management – and Windows 7 troubleshooting.
DPC stands for Deferred Procedure Call. If any kernel-mode device driver in your Windows system is implemented improperly and causes excessive latencies of Deferred Procedure Calls (DPCs) then drop-outs will probably occur when you use real-time audio or video streaming applications.
In simple words, it’s the way how Windows manage and operate the drivers.
https://en.wikipedia.org/wiki/Deferred_Procedure_Call
Many years later Windows 7 become one of the most stable operating systems from Microsoft. I was a quite happy user as many other users. Getting myself Windows 7 Home edition gave me almost trouble free experience.
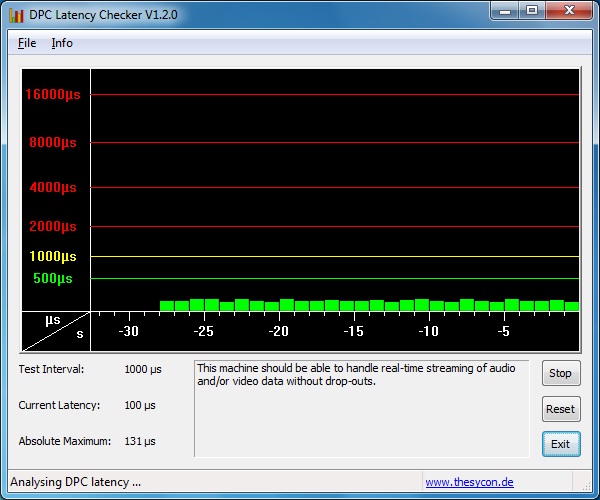
I’ve got a few audio clicks and pops, so the tool at that time for diagnosing my DAW and diagnosing and solving the problem on Windows 7 was Thesycon’s DPC Latency Checker.
https://www.thesycon.de/eng/latency_check.shtml
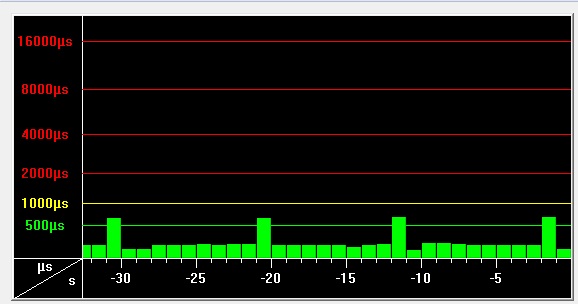
You can see DPC interrupts spikes on the screenshot.
I was using cheap VIA Firewire PCI card and that was causing the problem.
Changing slots and moving around the VIA card couldn’t help. It was a matter of stable drivers and more solid chipset.
The solution was easy. I have got a proper Firewire PCI card with TI / Texas Instruments/ chipset, so my trusty TC Electronic Desktop Konnekt 6 audio interface worked great after the upgrade.
I’m still using it today even it is already discounted!
Here is a screenshot how changing the Firewire impacted the DPC Latency in my Windows 7 machine.
Steady and solid diagram
After, the release of Windows 10 and “forcing” users to update and move to newer systems, I’ve jumped the ship and upgraded my Windows 7 installation to the new operating system.
My current “new” PC build runs great out of the box, but the clicks and pops showed up again. I’ve got random glitches while recording and moving windows around while a project with few amp sims and a drum sampler playing.
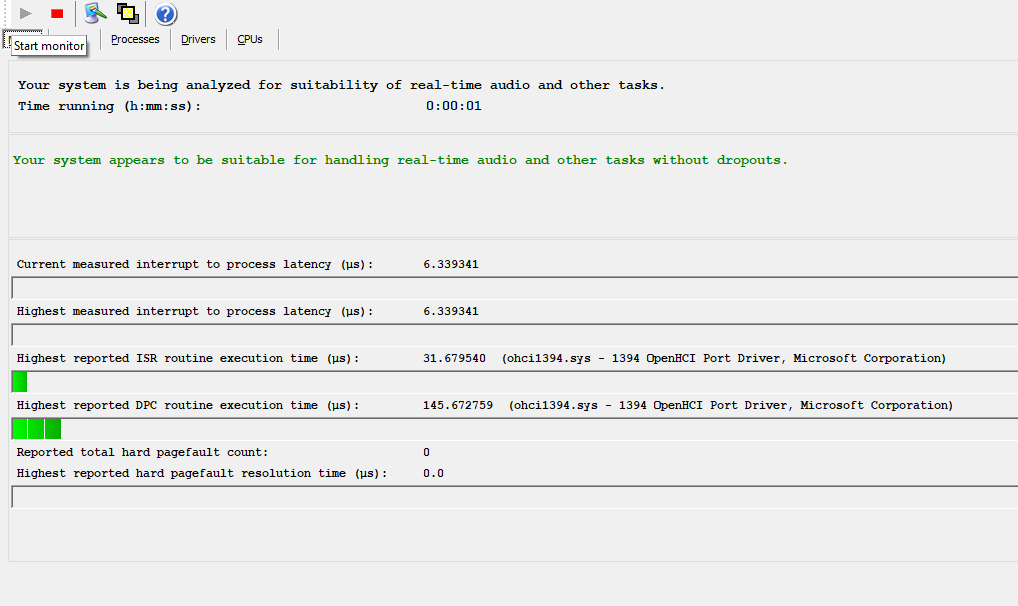
So the first thing to be sure if your PC has DPC / drivers conflicts/ problems and to troubleshoot them is to use the proper tool.
The best available utility today for Windows 10 is LatencyMon by Resplendence.
This program will tell you if there are any DPC issues and which driver is causing them.
http://www.resplendence.com/latencymon
The biggest reason for high DPC latency peaks is a conflict between two hardware devices, usually the sound card and something else. You should disable WiFi, LAN, USB controllers, Video Card drivers.
If you have many USB peripherals devices such as WiFi USB dongle, Card reader or Web Camera, start disconnecting one by one. The most problematic ones are the WiFi dongles or your video card.
In my case, it was my old NVidia GT220 video card salvaged from my previous build.
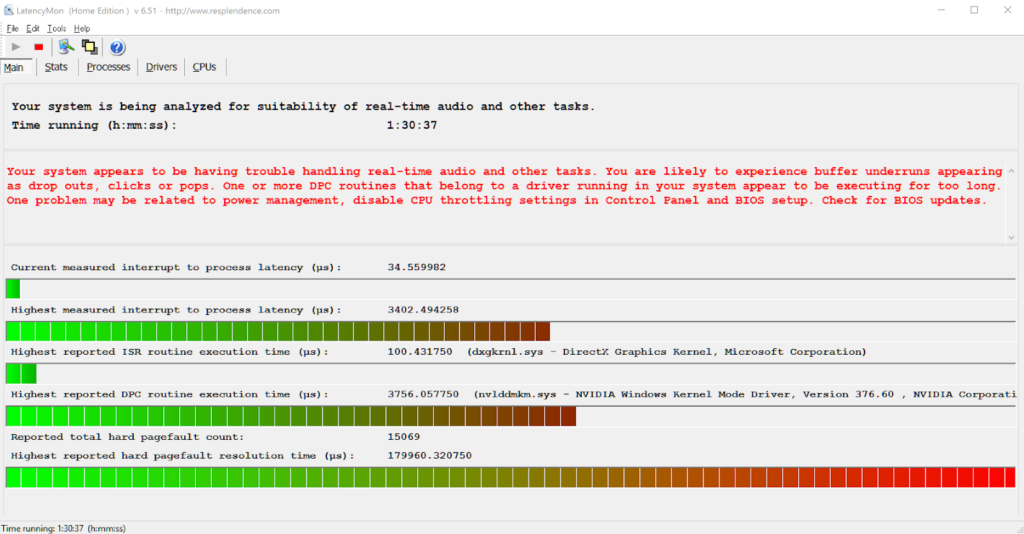
nvlddmkm.sys apart from the NVidia drivers
Its well know problem over the forums and after removing the NVidia card and enabled I5 4670 CPU integrated Intel HD Graphics 4600, the DPC interrupts disappeared. That solved the problem.
No more clicks and pops using Reaper 5 on 128 buffer or even at 64 settings. Easy right?
Here is my current DPC status:
If you like to play games or running heavy video and photo editing programs,
the solutions are to get an AMD video card or try another modern Nvidia model.
But since I’m not a gamer and I’m using the computer only for audio production, the integrated GPU is enough and don’t forget, this saved me a few bucks!
AMD RX 560D is known for great stability and low DPC
https://www.amazon.com/MSI-RX-560-AERO-ITX/dp/B072J422CZ/ref=br_lf_m_au3puyuhb4ga2r6_ttl?_encoding=UTF8&s=pc
Here are a few steps to optimize your Windows 10 installation for even better performance and stability:
I will add a few important steps to optimize Windows 10
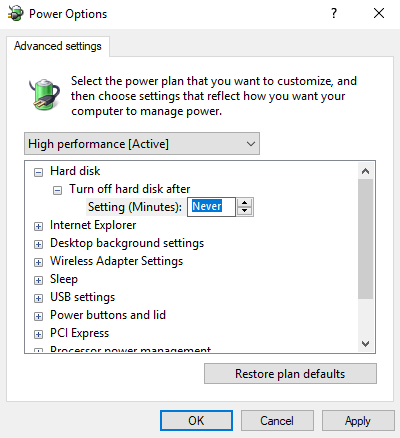
1. Set your computer’s power for high performance
This will set up your CPU to work at full speed all of the time. It will take more power, but this can have a huge effect on your computer’s audio performance.
Go to: Control Panel>Power Options
– Choose “High Performance”
– Then click the “Change plan settings” button. Make sure both power options are set to “Never”.

2. Disable and prevent Hard Disk to sleep
Back on the main Power Options screen, select Change plan settings.
Change the time under Turn Off Hard Disk After to Never
3. USB selective suspend setting.
Windows automatically put USB devices in a very low-power state when they’re not actively in use. This is mandatory if you are using USB audio interface!
Click on USB settings.
Then expand USB selective suspend setting.
and Select Disabled from the drop-down menu.
4. Disable Hibernation:
The first step is to run the command prompt as administrator. In Windows 10, you can do this by right clicking on the start menu and clicking “Command Prompt (Admin)”
Type in “powercfg.exe /h off” without the quotes and press enter. If you typed it incorrectly, the cursor will simply start at a new line asking for a new input
Now just exit out of the command prompt
5. Disable Search Indexing
Drive indexing is never a good thing to have running on any drive used in audio work. It can run at the most unfortunate times and disrupt data flow, causing slowdowns while recording and the DAW are streaming sound libraries.
Open file manager
Right-click on one of your samples – banks drive
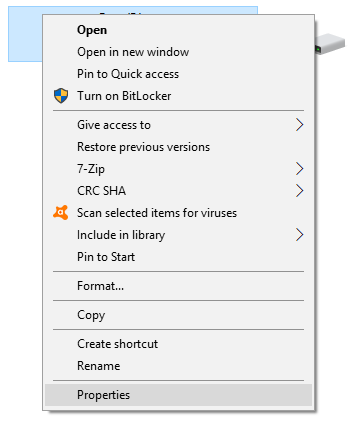
Click the Properties
“Allow files on this drive to have contents indexed in addition to file properties” will be checked.
Uncheck that item and click the [Apply] button (see image below).
It will take a long while depending upon how many files you have!

6. Disable ‘Windows Background Apps’
Windows 10, by default, runs a lot of Apps in the background. To disable them follow these steps:
1. Select ‘Settings’ from the Windows Start menu,
2. Then choose ‘Privacy’
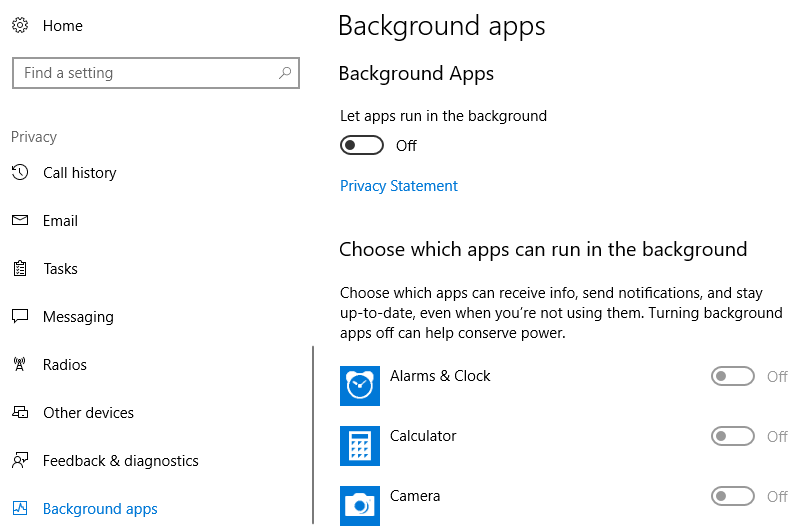
‘Background Apps’. From here switch ‘Off’ the apps that you do not need
7. Set processor scheduling to “Background services”
This will improve the performance of your audio drivers on your computer. To do this:
Open the control panel select “system”
Go to “Advanced system settings” and then click on the “Advanced” tab
Click on “Settings..” under Performance to open up the “Performance Options”.
Then go to the “Advanced” tab and select the processor scheduling as “Background Services”
After that click Apply” and then “OK”
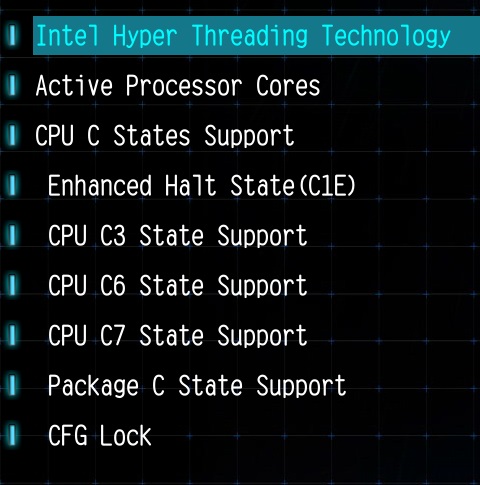
8. Furthermore: C-States in your BIOS
Disable C-States in the BIOS/UEFI,
C-States allow your CPU to sleep when idle, which may interfere with your DAW real-time audio processing.
In my Gigabyte bios, it’s in: “Advanced CPU Core Options”
There are different levels of C state, (C1E, C3 e) with the higher numbers generally corresponding with more aggressive power saving. If you still having audio glitches you can try and disable each of them.
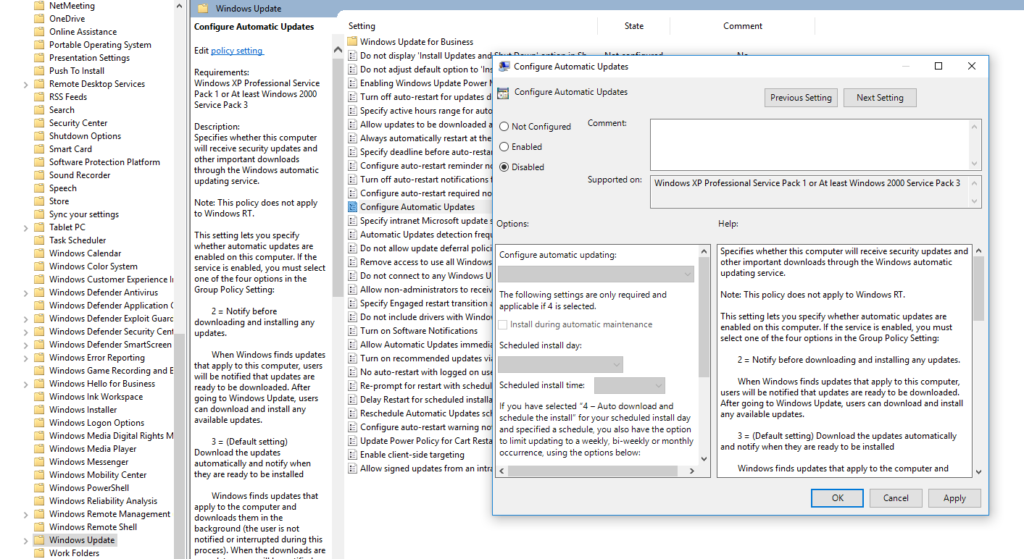
9. Disable Windows Automatic Updates.
Staying up to date is always a good thing. More security, more stability and so on.
But once my system is stable and running great I want it to stay in that way.
Disabling windows updates could prevent installing new buggy drivers, installing windows patches that could affect windows overall performance and causing applications incompatibilities.
You will need to change Local Group Policy settings!
Here’s how to change the Local Group Policy Editor settings:
- Use the Windows key + R on your keyboard to open the “Run” command window.
- Type gpedit.msc and open the Local Group Policy Editor.:
- Click and Expand on the left side: Computer Configuration\Administrative Templates\Windows Components\Windows Update.
- Click and Expand on the left side: Computer Configuration\Administrative Templates\Windows Components\Windows Update
- Select: Disable – Apply and then OK. Restart your PC
Windows 10 privacy and tracking
I’m sure everyone is aware of Windows 10 tracking system sending data to the Microsoft servers. It’s designed for better user experience, sending back the best updates and so on.
Aside from all of this these background processes are taking computer power resources and of course, we want that CPU power back, so we could enjoy our composing, recording and mixing process.
The program here is built by O&O.
I’ve tested it and I love the user-friendly interface.
Before that, I was searching online for the best ways to stop specific windows services and processes. It was a long unpleasant time-consuming process with lots of trials and errors, many times causing Windows reinstallation or restoring from backup.
O&O ShutUp10
https://www.oo-software.com/en/shutup10
I’m using: Apply only recommended settings:
It has a nice explanation of what every setting do and how it will affect your windows system.
The program will prompt you to make a Windows Restore point.
It will be easy to restore to a previous windows configuration if you face any problems.
But using the recommended settings never failed on me.
Backup your optimized DAW. Advanced users!
The most important and last step for me is to have a fully working backup of my setup on a separate hard drive.
Here are a few steps:
- Open Control Panel.
- Click on System and Security.
- Click on Backup and Restore (Windows 7).
- On the left pane, click the Create a system image link.
- Under “Where do you want to save the backup?”
- Using the “On a hard disk” menu, select the storage / especially dedicated for your system drive – backup/ to save the backup.
- Click the Start backup button.
When the process finishes, shut down your PC, disconnect the drive and store it in a safe place!
To restore. You will need your USB installation or recovery thumb drive
Insert the Recovery flash drive into a USB port and boot your PC. Hit F12 or F2
Refer to your manufacturer Bios shortcuts how to reach the Boot menu and choosing from which media to boot.
The installation process will lead you to a few steps.
Choose your language and click next
Click Repair your computer
Once you’re in a recovery environment, select Troubleshoot, then System Image Recovery.
Make sure your hard disk where the system image was created and located is connected and turned on. Follow the instructions.
System Image will format and repartition your hard disk and restore your entire PC exactly as it was when the original image you have created in the backups process.
Happy tweaking and don’t forget to make awesome music!
Dimi,