“How to Build an Effect Chain”
(Basic Pedalboard Routing)
The pedalboard is the command center of your guitar rig. It’s the driving source of energy that makes your amp shine. Today’s guitar players are obsessed with the idea of having the right pedals and their arrangement on the floor. But that is coming from a long history of recording and touring musicians trying different pedals in different combinations, starving for the best guitar tone and uniqueness. Every guitar player is an artist trying to sound distinct with their own personal tone character.
Making a good chain in front of your amp could be a confusing task. Pedals Do sound quite different placed above or beneath the boxes around them. There are no rules when making an art. But it’s always a good idea to have a deeper understanding of how each pedal sounds best and in which place it interacts best with the rest in the chain. We could organize each pedal in categories and then it would be much easier for a quick pedalboard build.
Think of each pedal and what it can do to your tone, smashing the dynamic or emphasizing the picking attack, adding color or giving you a sustain. Giving you more presence or taming the high end of the amp. Making your chorus part of the song full of energy and worthy of being remembered. All of those small subtle shades will give you the distinctive voice and recognition as a guitar player.
It’s an art, but without understanding and knowing the basics, you can spend many hours without having professional results. So, let’s write down the most common pedals and then put them into groups then explain how to chain them together on a pedalboard. We will look into the matter from a hardware perspective, but doing it in a digital environment using our Amplifikation 360. It’s a software playground as we often say. It allows us the full freedom to make any possible pedal combinations for the best tone ever! Using amp simulators and virtual pedals is a hassle free and quick process. We won’t be worrying about impedance and noise build up caused by bad power-supplies. But we will follow the logic.
Before we start you have to be careful with your gain staging. Each effect has a level knob that could boost the overall level of the pedal. It’s especially important for the modulation effects and delay and reverb effect. You have to feed them with a properly leveled signal, otherwise you can easily distort the input. You want a clean signal without artifacts.
Categories of the pedals in the most common order:
- Tools/Utility
- Volume and Filters.
- Compressors
- Gain, Drive and Distortion
- Modulations
- Delays and Reverbs
- Tools/Utility: Your tuner and wireless receiver, A-B box for switching different amp heads or full amps. Noise gate.
Tuner
The tuner works best by receiving an untreated signal from your guitar. The tuner will give you the best readings at the most first place of your pedalboard.
A-B switch
The A-B switch could route the guitar signal to two different chains of pedals or two different amps. So, the best places are in front of your group of pedal chains or after them, routing the signal to two amps.
Building the A-B switch in A360 is easy. Just utilize two of the Live View Switching buttons for your A – Pedalboard and your B – Pedalboard as shown below:
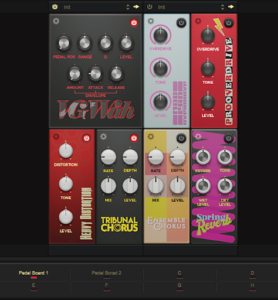
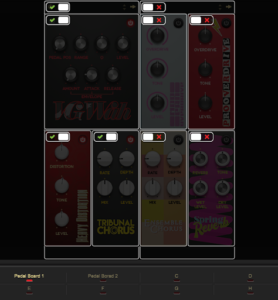
Put the pedals in separate containers and then assign the containers on – off buttons to a designated Live view slot switch. It works the same as using a real hardware A-B switch. You can instantly switch between two groups of pedals using a hardware midi controller.
Noise Gate
The noise gate is essential for clean phrases. Using it with a high gain distortion and amp is a must. Best place for the gate is after your tuner and A-B box and before your drive pedals. Play with the decay knob to find the best position when playing solos, you want to preserve the tails.
- Volume and Filters: Volume pedal, wah pedals, auto wah pedals, envelope following filters. EQ Pedal
Volume Pedal
The volume pedal is changing the level of your guitar signal entering the chain. It’s always a good practice to put it at the beginning of the pedalboard. It’s good for volume swells, for ambient chords – synth like harmonies. Also, to lower the overall gain and saturation of the following drive pedals and the amp. Another place for the volume pedal is just before the delay pedal. You can set it to cut the main signal of the guitar and leave the feedback repeats, after a musical pause.
Wah Pedal
The wah pedal is a filter pedal emphasizing or cutting a range of frequencies. It has vocal characteristics. As a general rule of thumb, the wah pedal sounds best in front of the overdrives and distortions. Why? Because it works best by filtering and shaping the overall tone beforehand. The wah is coloring the overdrive and distortion pedals without destroying their qualities.
Placing it after will make the tone mushy, without note to note separation. You are filtering the already hardly clipped and distorted signal. The tonal changes will be too obvious and most of the time too hard to accept. Of course, there are no rules, but in practice many guitarists are using the wah before the overdrive and distortion pedals. In front of a distortion and its upper position, it is sharpening the tone in a dramatic manner, it will cut through the mix when the arrangement is quite busy. Moving the pedal on its middle position is an ideal tone for long legato lines and melodies. Keep moving the pedal POS until you find the sound you love and then leave it there.
The wah pedal is a global tone changing tool, capable of drastic harmonic content changes.
EQ
The EQ pedal is a tone shaping and enhancing tool. You can re-voice your pedalboard or amp tone in a dramatic way.
Use the EQ before your distortion to clean up muddy sounding pickups. Boost the 800hz area to to change the distortion resonance frequency for the 80s famous riffs tones.
Placing it after the amp you can totally change the amp’s sound in 180 degree.
 Cut the 400th to remove the ‘boxy’ feeling. Remove some 800 and 1k to remove the nasal resonance from your amp.
- Compressors:
Use the compressors on clean tones to reshape dynamics and even out the notes. Also, the compressor helps with the sustain and its ideal for leads. Another place for the compressor could be between the amp and the cabinet. It’s a useful trick to “emulate” some dynamic behaviors of a real tube amp or even out a bass guitar line and shave the strong peaks.
- Gain, Drive and Distortion: Clean boost, Overdrive pedals, Distortion pedals and Fuzzes.
A Clean boost pedal in front of an overdrive or distortion pedal is a good way to get more sustain and more saturation. A good clean boost pedal won’t color and change the frequency spectrum of your pedals. For a Clean boost you can easily use our Effector EQ.
Also, you can reshape the guitar signal, by lowering the low range and then use the output level potentiometer, to push the input of the amp. You will get more definition, volume and distortion.
It’s especially good in cases when you are using a low gain amplifier and want to retain the character of the amp.
The Overdrive and Distortion pedals are always used in front of the amp.
- Boosting the clean channel, giving you a bluesy or classic rock tone.
- Using the Distortion pedal for your main overdriven tone.
- To change the amp distortion amount.
- Tightens the low end and “re-voicing” the amp’s own tone.
Overdrive Pedal
You can make an American style amp to sound like SRV. Also, you can use it any time to get more distortion of the amp and to push your solos. They are your friend when it comes to tone shaping. It amplifies your signal and causes the amp to distort earlier. Another common use of the screamer type overdrive is to tighten up the low end of a high amp. Especially in the modern metal styles.
The overdrive pedal will interact with your playing styles and how hard you hit the strings! The overdrive is your swiss army knife.
Distortion Pedal
The distortion pedals are based on the overdrive pedals, but with more gain and saturation.
You can use them as a main source for your distortion tone or use them to shape the sound of the amp. Each one of them has different tonal properties. So, don’t be afraid to use a distortion pedal on the clean channel and find your own voice!
Fuzz Pedal
The Fuzz pedals are full with harmonics and with lots of gain. You have to play with the amp gain and the Fuzz gain pot to find the sweet spot. Most of the time if you overdo it, the signal turns into a squashed mess. Use an American Bassman or British 45 amp with the fuzz pedal and tweak the amp master. The tone will get fatter with more master level.
- Modulations: Flanger, Phaser, Chorus, Tremolo
Best place for your flangers, phasers and choruses are after your distortion pedals. Why? The distortion pedals are heavily saturated and using a chorus before the distortion won’t do much for your tone, the characteristics of the modulated signal will be lost. But of course, there are no exact rules!
Flanger
Actually, using a Flanger before your Distortion will do that 80s jet plane sound.
The flanger pedals are ideal for sweeping and dreamy tones. You can create your ambient swells and pad-like harmonies, combined with long delays and shimmer reverbs. It’s a real creativity tool!
Phaser
Using the phaser before the distortion pedal is like having a moving wah pedal. Playing with the mix and depth controls could emphasize the effect of the Phaser further.
Also using the phaser on the amp clean channel is an ideal place for Funky clean tones, imitating a slight wah effect.
Chorus
When it comes to the chorus pedals, we want them to spread our stereo field, to make our tone thicker. Or to simulate an ensemble of two or more guitars playing together. One of the preferable places is to put the chorus after the amp and before the cabinet, then activate the stereo mod.
Tremolo
The Tremolo Effect is altering the amplitude – the volume of the audio signal.
The best place is to put it after all your drive and modulation pedals in the chain to preserve the pulsation and to have a more pronounced impact on the overall sound.
- Time based: Delays and Reverbs
Delay
The delays are coming first. They are creating repetition of the signal and each of the small repeats will interact with the reverb tails in a more musical manner. So, always place the delay before the reverb.
If you want the cleanest delay effect always put the delay after the amp or after the cabinet. Think of it as a send and return effect in your mixing desk. It’s a space creating effect giving the depth and 3D feeling. They work great for leads with long repetitions. But there are many guitar players who put the delay in front of the amp. Whatever works for you!
 Set the delay to about 130ms for that rockabilly slap back guitar sound.
Reverb
The reverb is where your guitar becomes alive. It’s easily neglected and forgotten when playing with amp simulators and software plugins. But all instruments are usually played in acoustic places, like rooms, big venues and concert halls. The reverb pedals are designed to simulate an acoustic space with different reflections.
Most of the classic recordings and your favorite guitar tones are recorded in studios with great acoustic properties and with a few sets of microphones. The microphones are recording the room’s acoustics too. The reverb effect could be used to put back the guitar in the mix. You can reshape the whole mix of your track when fiddling with your solo guitar, just with a reverb and playing with the dry and wet levels. Always treat your guitar with a bit of room type of reverb if you want to sound more natural. Also, it’s an amazing artistic tool for creating ambient tones. The modern Ambient guitar style is based on heavily used reverbs and especially the shimmer types.

An example of our preset “Shoe Ambient Gazing” with more complex effect combinations.
Stacking pedals together is fun. It’s an art! Of course, all written up above is just a small guidance to understand what are the most working positions of each pedal type and how to get quick results. Please, always experiment and don’t be afraid to break the “rules”
Every artist has the obligation to learn from the masters and then become the next one!
Art is an evolving creature and your pedalboard is just a brush with a few colors. The white canvas is your new track, your next album. So, start moving around the pedals, tweak the knobs and make awesome music!