
Amp simulators are a modern-day solution for creating realistic and authentic guitar tones. In this article, we explore the benefits of using amp simulators instead of physical amplifiers and how to use them like a pro. We will guide you through the process of setting up an audio interface and recording with an amp simulator.
What is an Amp Simulator?
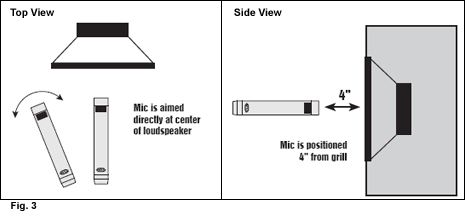
Figure Looks familiar? You can do this on Amp Sims too. Source: mxlmics.com
An amp simulator is a digital emulation of an amplifier that aims to recreate the sound of a real guitar amp. It can be used to add an authentic and realistic sound to recordings, live performances, and music production. In the past, guitarists had to use physical amplifiers which were expensive, space-consuming, and inconvenient. The good news is that guitarists can create realistic guitar tones without caring about re-recording an amazing performance, because of undesired guitar tone. You can tweak it any time you want, during the mixing process.
Benefits of Using Amp Simulators
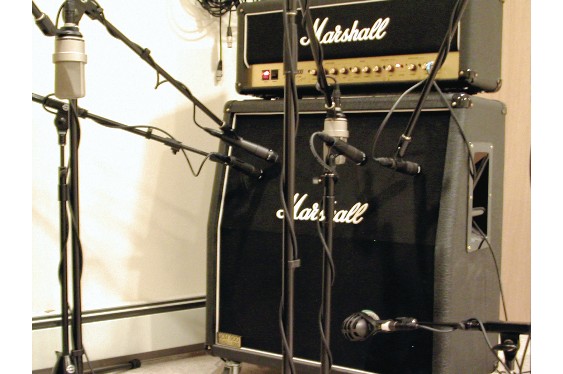
miking real amp. Source: Recording Magazine
There are several advantages to using amp simulators instead of physical amplifiers. The first advantage is that they are significantly more cost-effective, since they are usually much cheaper than buying and maintaining a physical amplifier, which is more expensive. In addition, they are much more convenient to use because they can be accessed from a computer or mobile device. Thirdly, they offer more flexibility as they can be used to create a variety of guitar tones.
How to Use an Amp Simulator
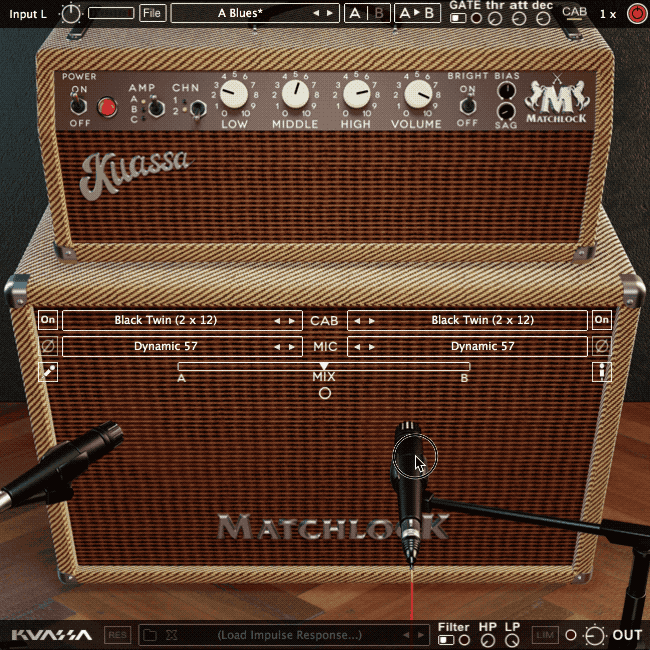
Kuassa Amplifikation Matchlock Amp Sim. Modeled after the American amp
The process of using an amp simulator is relatively straightforward. The only things you need to get started are an audio interface, a computer or a mobile device, and the appropriate software or application. After you have installed the amp simulator software, you can begin to adjust the settings and parameters to create the desired tone. The cool thing is many amp simulators also come with a professionally crafted library of presets, allowing you to get started quickly and easily. Check out our Amplifikation A360 suite and the hundreds of tones included! They are ready for your production.
To get started with amp simulators, you need an audio interface, a computer, and the appropriate software. You can connect your guitar to your audio interface, install the necessary software, and configure your audio interface. After that, you can set up the amp simulator by selecting the desired amp model, adjusting the gain and tone settings, and adding effects. Finally, you can record and edit your audio with your DAW.
By following these simple steps, anyone can create realistic and authentic guitar tones like a pro. Amp simulators are an essential tool for any guitarist looking to create great sounding guitar tones without caring about re-recording amazing performances due to undesired guitar tone.
Setting Up An Audio Interface And Recording With An Amp Simulator
The setup of an audio interface and recording with an amplifier simulator is not as difficult as you might think.
Step 1: Gather the Equipment
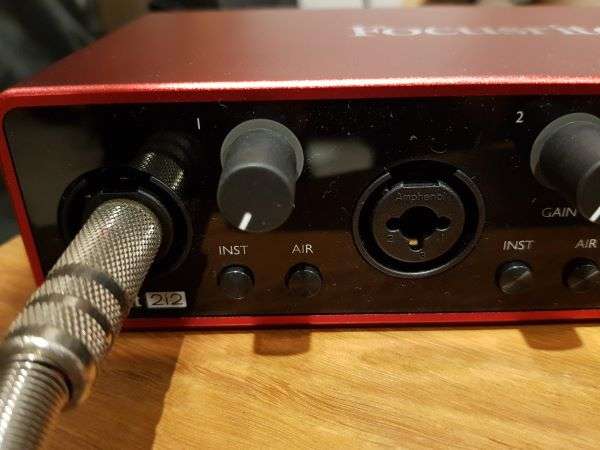
Figure Hi-Z / Inst Input Example in a soundcard. Source: audiointerfacing.com
The first step in setting up an audio interface and recording with an amp simulator is to connect your guitar to your audio interface. You’ll only need your instrument guitar cable and then plug in to the audio interface “INST” or HI-Z input. Then tweak the input gain knob, where your goal is to get a good level that does not engage the red light led.
Figure Hi-Z / Inst Input Example in a soundcard. Source: audiointerfacing.com
Read Our Article About Choosing an Audio Interface:
- https://www.kuassa.com/top-10-usb-audio-interface-under-300/
- https://www.kuassa.com/beginners-guide-how-to-choose-an-audio-interface-part-1-of-3/
- https://www.kuassa.com/beginners-guide-how-to-choose-an-audio-interface-part-2-of-3/
- https://www.kuassa.com/how-to-choose-an-audio-interface-part-3-of-3/
Step 2: Install the Software
When you have all the levels setup, the next step is to install the necessary software. Most audio interfaces come with some sort of software, such as a Digital Audio Workstation (DAW), that allows you to record and edit audio. If your audio interface does not come with a DAW, you can always download one from the manufacturer’s website. Reaper DAW is a good starting point and affordable solution.
Read our article about DAWs:
- https://www.kuassa.com/the-best-of-cheap-daw-recording-software-2015/
- https://www.kuassa.com/which-daw-software-is-best-for-you-our-all-time-favorite-daw-pt-1/
- https://www.kuassa.com/plugins-role-in-digital-audio-workstation-software/
Step 3: Configure the Audio Interface
After you have installed the necessary software, the next step is to configure your audio interface. This involves setting up the inputs levels and outputs and ensuring the appropriate settings are in place. For example, you’ll need to set the sampling rate of your audio interface and the bit depth for recording and most importantly the ASIO driver buffer settings to get the lowest possible latency.
Read our article about optimizing Windows PC:
https://www.kuassa.com/optimize-your-windows-pc-daw-for-audio-stability/
Step 4: Set Up the Amp Simulator
The next step is to set up the amp simulator. This involves selecting the desired amp model, setting the amount of gain, and adjusting the tone settings. Keep in mind, the most important parameter to adjust when using an amp simulator is the gain. This will determine the loudness of your output and will affect the distortion and the saturation of the amp – which means less or more sustain. Other parameters, such as the treble, mid, and bass, can also be adjusted to shape the sound further. Finally, effects such as reverb, chorus, and delay can be added to further enhance the sound and achieve your desired tone.

Step 5: Record and Edit
The final step is to record and edit your audio. You can use your DAW to record and edit audio, as well as to mix and master your recordings. Once you have recorded the audio, you can use the amp simulator to fine-tune the tone of the recording. You can also change the amp type, the cabinet and microphone settings – positions. Following these steps will help you get started recording with an amp simulator. With a bit of practice and patience, you’ll be able to get the most out of your setup and create great sounding recordings.
Read our article about guitar recording tips:
- https://www.kuassa.com/recording-flawless-guitar-to-the-amplifikation-plugin-part-1-gear/
- https://www.kuassa.com/recording-flawless-guitar-to-the-amplifikation-plugin-part-2-tone-building-workflow/
- https://www.kuassa.com/recording-flawless-guitar-to-the-amplifikation-plugin-part-3-real-world-counterpart/
- https://www.kuassa.com/how-to-sound-like-gojira-with-efektor-whammo/
Conclusion
Amp simulators are better than real guitar amplifiers in modern days because they are more affordable, easier to use, and they give you access to a wide variety of tones that can be tweaked and customized to your own personal preferences. Amp simulators are an essential tool for any guitarist looking to create realistic and authentic tones. They offer a cost-effective, convenient, and flexible way to create great sounding guitar tones. With the right software, anyone can create realistic sounds with ease.
Happy playing and recording!